Showing posts with label Jelly. Show all posts

Thursday, February 17, 2011

Koi Fish Jelly


Today marks the last day of Chinese New Year and also Chinese Valentine's Day.  The 15 long days of Chinese celebration is finally over.  Right now I can concentrate on losing some extra weight gain.  LOL!

Sharing with you a Koi fish Almond Konnyaku jelly that I made recently.  To get this pattern, all you need to do is to take a little bit of the jelly water out and mix it with a drop of red coloring, stir to blend well.  Use a spoon to spoon a little of the red jelly inside the fish molds.  You can wait for it to harden before scooping the white jelly in to have a white fish with red strips, or if you couldn't wait like me, before the red jelly harden completely, I scoop the white jelly in and thus it became pink fish.  Got the idea?  I used black sesame seeds as eyes on the big koi fishes.  I later added the black sesame seeds on the little fishes too.  Definitely nicer with the black sesame seeds.

By the way, Happy Chinese Valentine's Day to all who celebrate this day.  Wish you find your other half soon if this is what you are wishing for. :-)  And have a great "Chap Goh Meh"!!


Sunday, April 18, 2010

Almond Konnayaku Jelly


I promised my girls to make them some Konnyaku jelly.  I always made the konnyaku jelly to bring to friend's house or party and my girls always complaint that they never got to eat it.  Poor thing right?  So, this time I made it all for them.  I have a canned of evaporated milk and I loved almond jelly so decided to make it almond jelly.  I added slightly more water so that it was not as chewy as usually we liked our almond jelly soft.  Almond jelly was best served with mixed fruits or canned longan (picture shown) or lychee.  It was a great party favorite dessert too.  Truly delicious!


If you don't have the konnyaku jelly, just use the normal plain jelly powder and added some evaporated milk or milk and almond essence.  Usually the milk is an added on as this almond jelly should be enjoyed soft.  Read the direction at the back of the box and change according to package direction.


Ingredients:

1 package of Redman Konnayaku jelly powder (10oz)
1 cup of white sugar
950ml water
150ml evaporated milk
1.5 tsp. almond essence

Method:

1.  In a bowl, mix together the jelly powder and sugar.  Set aside.

2.  In a large saucepan, boil the water and evaporated milk.  When almost boiling, add in 1 above, stir to dissolve the sugar.  When boiling, turn the heat off and keep stirring until bubbles become less.

3.  Pour into prepared konnyaku jelly molds.  If not, just pour into a rectangular pyrex pan or any deep shallow pan would do.  Let cool.

4.  Put in the refrigerator to harden, at least an hour.  Open a canned of longan or lychee and serve with this almond jelly.

Tuesday, February 23, 2010

Rose Konnyaku Jelly


How you like my twin Koi fishes?  Spotted my mistake yet?  I made a mistake here when I made thing without thinking.  I should have pour some konnyaku liquid in the mold first before I added in the mixed fruits.  I just added the mixed fruits into the mold and pour in the konnyaku liquid and let it set.  So, the end result, not as pretty and some of the mixed fruits fell off when unmold.  Oops!


If you want my rose flavored konnyaku jelly recipe, you can get it here.  The rose flavored is really great, I loved it because it reminded me of the rose drink that the Malay served in Malaysia during Hari Raya.  Here nian nian you yu to all of us!

Monday, April 6, 2009

Red Bean Konnyaku Jelly


I was in the mood for some jelly and red bean jelly to be exact. The only jelly powder I had in my pantry was Konnyaku jelly powder, so Konnyaku jelly it was. I bought some mooncake jelly molds when I was in Malaysia last year so I thought this would be the perfect time to use it or open ceremony with it like we Chinese said. I do love this molds, making the jelly looking ultra cute. I wanted to make a red bean jelly because I had a canned of red bean and making a red bean jelly was much easier than making a red bean kuih even though both tasted great. Also I got to use my new jelly molds. :)


Here's my easy, refreshing and delicious red bean jelly recipe. No pre-cooking of red bean required. ;)

Ingredients:


(A)
One packet of Redman Konnyaku jelly powder (10gm)

3/4 cup sugar


750ml water

200ml whole milk (you can use skim or 2%)

One 475g (16.75oz) canned whole red bean (shelled) for dessert topping


Method:


1. In a bowl, mix (A) together and whisk to combine. Set aside.


2. In a medium pot, add 750ml water to boil. When boiling, add in (A). Whisk until sugar dissolved. Add milk and red bean, whisk to blend well.


3. Pour into jelly molds of your choice. Let it cool at room temperature before transferring it to harden completely in the refrigerator. Roughly 2-3 hours.
Serve chilled.

Friday, February 6, 2009

Sweet Corns Konnyaku Jelly


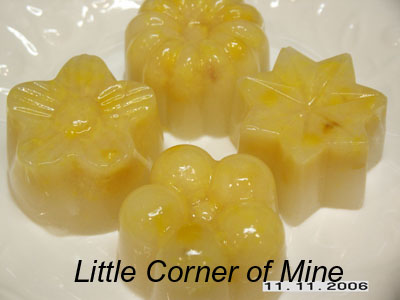
I made this to bring to a friend's house. Pineapple in Hokkein is "Ong Lai", signify prosperity for the Chinese. So, Chinese love to serve pineapple tart, pineapple related dish or even a jelly that shaped like a pineapple during the 15th days of Chinese New Year. I picked this cream corns recipe because yellow color is so suitable for pineapple. Pretty or not? The sweet corn konnyaku jelly that I made is not that chewy, it's softer more like a normal jelly. If you want it chewy, follow the 550ml water amount listed.


Ingredients:

1 packet of Redman konnyaku jelly powder (10 gm)
1 cup granulated sugar

1 canned of cream style sweet corns (14.75 oz)

750ml water (use 550ml if you want it chewier)

200ml milk (whole, 2%, 1%, skim ~ up to you, I used whole)


Method:


1. In a big bowl, combine the sugar and konnyaku powder, stir to mix well, set aside.


2. In a big saucepan, add in the water and milk, bring to a slow boil (watch don't let it over boiled), add in the sugar and konnyaku powder mixture, turn to medium-low heat. Stir until sugar dissolved. Add in the cream style corns, stir to mix well. Turn off switch. Ladle the liquid into the konnyaku jelly molds, or any jelly mold you have.


3. Let it cool at room temperature for a little while before putting it in the refrigerator for 3 hours, or until it harden completely.

Wednesday, June 25, 2008

Rose Flavored Konnyaku Jelly


What these three ingredients combine into? A pretty in pink Konnyaku Jelly with kiwi seeds. As for konnyaku powder goes, I still very much prefer the Red man brand. The texture provided by this brand is more chewy as opposed to the other brand that I had tried. I bought these Red man kiwi seeds and konnyaku powder on my last trip home. I always fascinated by the kiwi seeds and so glad that I saw it on the shelf. Now that I have tasted it, I can let you know that this seed is for decoration only. You can't really taste the seeds while eating the jelly. But it sure add a little something to the jelly and makes it very pretty.


I made this rose jelly before and really loved the flavor it gave. So, I decided to share it with my readers. Of course you can omit the kiwi seeds if you don't have it. For the above, I just wanted to showcase the new Konnyaku jelly mold that I acquired at Ng Ming Huat, JB. I simply love the bears and turtles! I heard so much about Ng Ming Huat that while I was in JB, I just had to ask my hubby to bring me there. Luckily he still know the way after these many years. One thing I like to say about this shop is, it seriously needs expansion (or a bigger shop) and organization. The way I had to dig through some products, walked through that shop and came out with dirty hands, I also don't want to say more.

Ingredients:


Kiwi seeds (1/2 tsp. kiwi seeds and follow the package direction)
1 pkg of Red man Konnyaku powder
(10gm)
1 cup of white sugar

1/4 tsp. Rose essence (preferably the brand above)

950ml water


Method:

1. In a bowl, mix the konnyaku powder and sugar together. Set aside.

2. In a pot, add in the water and stir in (1) and the kiwi seeds. Turn on the heat and stir continuously until it boils. Turn off heat and stir for 5 minutes more or until no more bubbles.


3. Pour into the desired mold and let it set in the refrigerator for 3 hours.

For those who are unfamiliar with Konnyaku jelly can read about it here.

Wednesday, July 4, 2007

Lychee Konnyaku Jelly

The weather is turning warm and what a better way to cool off the body than some cold jelly? You can either make this with the normal jelly/agar-agar powder or konnyaku powder. I like to add the fruit for the extra refreshing taste.


Our family favorite ~ lychee konnyaku jelly.


Ingredients:
1 packet of Konnyaku powder (10gm)
Juice of one canned of lychee + water to reach the amount of water indicated by the packet.
1 cup of sugar
Lychee from one canned

Method:
1. Mixed the konnyaku powder with sugar in a bowl. Boil the water + lychee syrup in a saucepan until boiling.
2. Add in the powder and sugar mixtures. Stir to dissolve.
3. Arrange the lychee inside the konnyaku molds. Pour the jelly liquid to reach half of the molds and come back to fill the molds until it reach the top.
4. Let it set in the refrigerator before serving.

p/s
Happy 4th of July to those who resides in the United States!

Wednesday, May 9, 2007

Gula Melaka Sago and Pandan Jelly


Since we all love sago, I decided to make sago jelly with my leftover gula Melaka syrup and evaporated milk from making the ice-kacang. I added Pandan paste in the milk portion to make it more fragrant.


It turned out pretty good. A nice dessert for tea time and after dinner.

Sunday, December 3, 2006

Sweet Corn Konnyaku Jelly


I saw this recipe at Yochana's blog and decided to give it a try. My elder daughter loves jelly and I was looking for other simple recipes to try besides my usual. This recipe caught my eyes because I have all the ingredients in my pantry, so all I have to do is to take it out and make it.

One note to make though I used 10gm of konnyaku powder instead of 15gm noted because my packet of Redman Konnyaku powder comes with 10gm. I followed the rest of her recipe the same and it turned out great. Also make sure you buy the extra creamy cream corn, would taste better in my opinion (I used the normal cream corn and would prefer otherwise).

Yochana, thank you for the recipe! :)

Wednesday, June 29, 2005

Layers Pandan Konnyaku Jelly


Since I didn't have any fresh fruit in the refrigerator, I decided to make the double layers pandan flavor Konnyaku jelly. I just followed the recipe at the back of Red Man Konnyaku jelly and added pandan essence and pour half of it into the mould. Place the half filled mould into the fridge to speed up the harden process and meanwhile adding some milk into my leftover jelly liquid. Took the mould out and filled the rest of the milk base jelly into the mould, put in the fridge for at least 3 hours before consuming. What can I say except yummy...the texture is just shiok especially on the hot summer day.