Showing posts with label Cake. Show all posts

Thursday, September 1, 2011

Pear Preserves Cake


One of the reasons I made the pear preserves was I wanted to make this cake.  This cake was soft and moist and well received by my girls.  In fact, I am going to make this cake again.  I could taste the pear preserves in the cake.  The dried pineapple that I added increased the cake sweetness.  I would omit the dried pineapple next time I made this cake as I wanted to taste the pear alone without any competition from other flavor.  The dried pineapple sank to the bottom of the cake pan while baking and sort of glue to the pan and resulted the finished cake got stuck to the pan.  Hence, I advice you to line the pan with parchment paper if dried pineapple is used.


You can definitely substitute pear preserves with apple sauce or apple butter.  It should come out equally good even though I have not tried it before.


Ingredients:

(Wet)
2 eggs
1/2 cup oil
1/2 cup 1% milk (or milk)
1 tsp. pure vanilla extract

(Dry)
1/2 cup sugar
1/2 tsp. baking soda
1/4 tsp, baking powder
1/2 tsp. salt
1 cup all-purpose flour

1/3 cup dried pineapple (optional)


Method:

1.  In a big bowl, add in eggs, whisk well with a hand whisk.  Next add in oil, whisk until combine.  Then, add milk and vanilla, whisk well.  Add in pear preserves, whisk well.  Preheat your oven to 350'F.

2.  Now add the dry ingredients.  Add in sugar, whisk well.  Add in baking soda, baking powder and salt, whisk well.  Now add in flour, whisk until combine.  Lastly, add in the optional dried pineapple.  Use a spatula to stir it in the batter.

3.  Line a 8" square pan with parchment paper and spray with butter.  Pour the batter in.  Bake for 30 minutes or until a toothpick inserted comes out clean.

4.  Cool completely on wire rack before storing in an air-tight container.

Thursday, June 30, 2011

Pandan Kaya Sponge Cake


This is the most basis sponge cake recipe uses only eggs, sugar and flour.  I flavored it with pandan paste or you can use pure vanilla extract for the vanilla flavor.  I made this because I just made a bottle of pandan kaya using my bread maker and I wanted to have it with some sponge cake.  I had used this sponge cake recipe for swissroll before and this recipe works well for me.  If you have been my avid reader, you should realize that I always stick to the recipe that works well for me.  Not quite adventurous as to try other sponge cake recipe.  Or simply put, just used the one easy sponge cake recipe that does not require to separate the eggs into egg white and did it like the chiffon cake method.

This cake was spongy and delicious with the double pandan flavors from the cake and kaya.  Quite fattening I must say, that's why it was served in small pieces, but one piece was never enough.


Ingredients: 

3 large eggs
1/2 cup granulated sugar
3/4 cup all-purpose flour, sifted
1/2 tsp. Pandan paste 

Kaya jam for spreading, as needed


Method:


1. Preheat oven to 400'F. Grease a 12x8-inch jelly roll pan and line with parchment paper. 

2. Combine eggs and sugar in a bowl. Beat with a handheld electric mixer until thick and mousse-like. (When the beaters are lifted, a trail should remain on the surface of the mixture for at least 15 seconds.)  Add pandan paste and beat well. (Make sure you beat until thick and mousse-like as this is the most important step in making this sponge cake, or else you would fail and your sponge cake would be hard)

3. Carefully fold in the flour with a large metal spoon.

4. Spoon into the prepared pan, spread evenly to the edges and bake for 10-12 minutes, until the cake springs back when lightly pressed.

5. Neatly trim the edges of the cake.  Cut into half and sandwich kaya jam between the cake.  Cut into petite pieces to serve.


Sunday, June 19, 2011

Chocolate Cake with Chocolate Glaze for Father's Day!


I want to wish all the dads a "Happy Father's Day" especially my dad.  Dad, I love you and may you have a wonderful time on Father's Day.

We are going to celebrate Father's Day with a bunch of friends (dads) tonight so I made this simple and yet yummy cake to bring along.  I made this cake before on Edda's first birthday and really liked how soft the cake was.  Instead of cream or frosting, I chose glaze instead since in my mind it was healthier.  :-P


This recipe made two round pans cake.  My girls wanted to put sprinkles on the cake and I obliged, I thought it would make the cake more colorful.  Instead of chopped walnuts, I used peanuts instead.  My girls loved this cake as they couldn't wait to taste one of the cakes and requested I make this on their birthday for them.

Ingredients:

Adapted from Pusiva's Moist Chocolate Cake with minor changes.

1 1/4 cup cake flour
1/4 cup specially dark cocoa powder
3/4 tsp. baking powder
3/4 tsp. baking soda

2 Tbsp. hot water
1 tsp. instant coffee granules

1 cup sugar
2/3 cup butter
2 large eggs
1 tsp. Irish cream liqueur

3/4 cup water

Method:

1.  Sift together flour cocoa powder, baking powder and baking soda in a bowl, set aside.

2.  Dissolved coffee granules in hot water, set aside.

3.  Beat butter and sugar with an electric beater until light and fluffy.  Add eggs one at a time.  Beat well.  Add in coffee and Irish cream liqueur, beat well.  With a spatula, gently fold in the flour mixture alternating with water.  Start and end with the flour mixture.

4.  Pour and divided the batter into two greased and flour round pans.  Bake in preheated 350'F oven for 25 minutes or until toothpick inserted comes out clean.

5.  Cool completely on wire rack.  Spread with chocolate glaze and top with chopped nuts, sprinkles, chocolate chips if desired.

Chocolate Glaze 

3/4 cup semisweet chocolate chips
3 Tbsp. butter
1 Tbsp. honey
1 tsp. Irish cream liqueur

Add all ingredients in a microwave safe Pyrex bowl and microwave for 45 seconds, stir and mix well until spreading consistency.  If needed, add 15 seconds intervals until spreading consistency.  Spread on cooled cake.  Spread on slightly warm cake is okay too.

Monday, February 14, 2011

Kuih Bahlu 2 (Chinese Egg Sponge Cake, 鸡蛋糕)


I did a Pandan Kuih Bahlu before in year 2008 and never try it since.  Because I found the recipe a bit dry.  This year I had no plan on making kuih bahlu but while I was browsing and jumping blogs, I decided to check out Sinner's blog.  And then I saw her kuih bahlu recipe posted last year.  I quickly compared her ingredients with the one I made before and found that hers uses less sugar and flour and she also stated that hers produces soft kuih bahlu.  So, I got interested and prompted me to try out her recipe.  I was glad I tried because it is indeed soft and slightly chewy.  Edda and myself couldn't stop popping a few of this once it was cooled.  :-P  However, after I kept it in the container, it turned sticky and moist unlike the dry kuih bahlu we used to.  Almost like the mini egg sponge cake I did in 2007.  So, I don't think this can be kept long.  Guess I will have to play with the old recipe again, like adding oil.


Guess you have noticed the ugly looking kuih bahlu I have right?  I don't have the pretty kuih bahlu mould so I used the mini muffin pan to make this instead.  If you too don't own the mould and wanted to make this, check out my instruction on the next page.  The method is about the same but slightly different.  You can still enjoy the kuih bahlu without the mould.  I guess the next time I go back to M'sia, I need to buy myself two kuih bahlu moulds.


Recipe adapted from Sinner, from Kitchen Redneck.  Thanks Sinner!

Ingredients:

2 large eggs
60gm sugar
1/2 tsp, pure vanilla extract
60gm all-purpose flour
1/4 tsp. baking powder

Method:

1.  Beat eggs with electric beater until light and frothy, about 2 minutes.

2.  Add in sugar and vanilla.  Beat until thick and yellow, about 2 minutes.

3.  Add in sifted flour and baking powder and use a spatula to blend well.

4.  Preheat oven to 375'F.  Grease the mini muffin tin with cooking spray.

5.  Scoop batter by tablespoon into mini muffin tin evenly until it reaches the top, not too much.

6.  Bake for 5 minutes or until golden brown.  Take it out with a toothpick and cool on wire rack.

7.  Store in air-tight container when cooled.

Makes about 22 pieces.  Recipe can be double.

Wednesday, February 2, 2011

Steamed Nian Gao (年糕)


This is again something new for me this year.  I always did the baked Nian Gao like all the previous years.  The baked nian gao is delicious too but this year I stumbled upon a Vietnamese steamed nian gao recipe from a blogger friend.  I tried a few of his recipes before and liked it, so it encouraged me to give this recipe a try.  Truthfully, what got me interested was the steaming time in his was only 20 minutes for a rice bowl size.  Hey, you know me, always seek out the easiest recipe to try.

I used my porcelain ramekin to steam my nian gao as I believed this shape resembled the one that I was familiar with the most.  Looks good right?  I won't be eating this until after the Chinese New Year as I wanted to use this to bring good luck to my house.  I heard that since this is sticky, it means family reunion and togetherness.  Also of the Chinese word 年糕, the last word sounded like high (高), so it's like each year is higher or better than the previous. (年年高升)

Since I am not eating this yet so I have no comment regarding the taste.  Probably will do a post later when I slice it and pan-fry it.

This is how it looks like when I took it out of the ramekin to cool on wire rack.

Happy Chinese Lunar New Year and Gong Xi Fa Cai everyone!!  May this new year brings you much joy, good health and abundance wealth.  祝您 兔年快乐, 健康良好,  万事如意,恭喜发财!!!


Recipe adapted from TT, Playing with My Food.  Thanks TT!

~Yields 3 porcelain ramekins.

Ingredients:

400gm glutinous rice flour
300gm Chinese brown slab sugar
220gm Coconut cream
155gm water


Method:

1.  In a saucepan, boil water and brown slab sugar until the sugar melted.  Take it off heat and stir in the coconut cream.  Leave to cool.

2.  While waiting for it to cool.  Cut the parchment paper to fit in the steaming cup that you prepared.  I used porcelain ramekins.

3.  When cooled, add in the glutinous rice flour and mix into a thick batter.  Scoop batter into each ramekin evenly.

4.  Steam in high heat for 60 minutes or until cooked.

5.  Let it cool on wire rack.  Stamp with a good luck symbol if you have one.  If not, just do it like me, take a red packet with good luck symbol, cut it out and place it on the nian gao when it is still warm.


Friday, January 14, 2011

Boiled Fruit Cake


I adore fruit cake and it is one of the cakes that I wanted either to bake my own or buy from the store during the Christmas holidays.  As you know, I skipped any recipe that seem too troublesome to make for example too many different steps that ended out with lots of dishes to wash.

I saw this Boiled Fruit Cake recipe at JoyofBaking and decided to read through the recipe and it was surprisingly fairly easy with minimal dishes to wash.  I only need to clean the saucepan and since I already have all the ingredients at home, I was eager to try it out.  It was named Boiled Fruit Cake because half of the ingredients were boiled on the stove and mixing in with the rest of the ingredients.  I modified the recipe by adding Brandy.  The only downside of this was it tasted better after three days and longer.  I read that if wrap nicely, it can be kept for up to six months.

My verdict is I find this fruit cake a bit dry, I would prefer it to be more moist.  So, the next time I make this, I would substitute the water with milk.  Hopefully then it will make this fruit cake better.  


I adapted this recipe from Joy of Baking with slight modification.

Ingredients:

(A)
1 cup dark brown sugar
1 cup water minus 2 Tbsp.
2 Tbsp. Brandy
1/4 cup or 4 Tbsp. unsalted butter
1 tsp. ground cinnamon
1 tsp. ground ginger
1/2 tsp. ground nutmeg
1/2 tsp. salt
1 cup raisins
(B)
2 large eggs, lightly beaten
1 1/2 cup all-purpose flour
1 tsp. baking soda
1 tsp. pure vanilla extract
(C)
1 cup dried cranberries
1 cup candied pineapple


Method:

1.  Spray a nonstick buttery spray in a 9x5x3 inch loaf pan.  Preheat oven to 350'F.

2.  In a large saucepan, over medium heat, bring to a boil (A).  Boil for 5 minutes, remove from heat and let it cool until lukewarm.  Stir into this mixture (B) in order listed.  Lastly add in (C) and stir to mix well.

3.  Pour into the prepared pan and bake for 45 minutes or until a toothpick inserted comes out clean.  Remove from oven and let it sit in the pan for 5 minutes.  Turn over the cake and let it cool completely on a wire rack.

4.  Wrap with foil and store, if possible keep it at least after three days before serving.  It can be frozen as well.

Friday, November 19, 2010

Spiced Pumpkin Walnut Cake


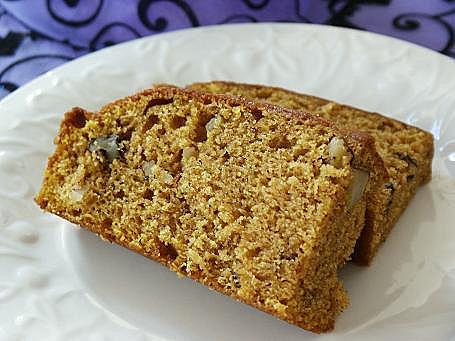
I cannot get enough of this cake, it is soft and moist and left you wanting more.  This is almost like my Best Ever Pumpkin Cake except it's has a little more egg with added walnut and one additional spice.  This cake is smaller and I used a 8-inch square pan to bake it.  I created this when I used 1 cup of the pumpkin puree to make the cookies and left with one more cup of pumpkin puree.  I loved pumpkin cake above all others, more than pie, cookies, soup, etc.  So of course I got to make it into a cake.


If you have canned pumpkin puree at home, give this recipe a try.  I am waiting for the Libby's canned pumpkin puree to go on sale so that I can stock up and make more of this cake.  YUM! YUM!  Oh yeah, need to buy more of the chopped walnuts too.


Ingredients:

(A)
2  large eggs
1/2 cup canola oil (or vegetable oil or other neutral oil)
1/2 (15 ounce) canned or 1 cup of pumpkin puree

1 teaspoon vanilla extract


(B), sifted or whisked
1 cups white sugar

1 1/4 cups all-purpose flour

1/2 teaspoon ground cinnamon

1/4 tsp. ground nutmeg
1/8 teaspoon salt

1/2 tsp. baking soda

(C)
1/2 cup chopped walnuts

Method:


1. Preheat oven to 350'F. Spray a 8-inch square pan with non-stick cooking spray with flour for baking.

2. In a big mixing bowl, whisk or beat together (A).


3. Then, add in (B) and stir together with a spatula until smooth and well blended or beat to blend well.


4.  Add in the chopped walnuts, lightly mix in.


5. Pour into the greased square pan and bake for 35-40 minutes. Cool in pan for 10 minutes before inverted to cool completely on a wire rack.  Best enjoy the next day.

Thursday, October 7, 2010

Pandan Chiffon Cake 2 (Healthier Version)


Pandan chiffon cake was my childhood favorite cake.  I remembered I always asked my mom to buy it at the bakery shop for us to have as breakfast.  It was great being a kid without having to worry about counting calories and just consumed however much we liked.  I seriously would not have known what went into making a cake, a bread, or a dish without me being a cook and a baker myself.  Once I learned that, I have to be careful at what to cook for my family and how much portion to consume in a day, you know to watch my diet and not over eating certain food that is high in saturated fat.


This recipe is adapted from my Pandan Chiffon Cake recipe but because I want to make it healthier with less saturated fat content, I omitted the coconut milk and used 1% milk instead.  I also changed the all-purpose flour to cake flour, just for experiment.  Glad to say it turned out well, still fragrant with Pandan smell and not much difference from the Pandan chiffon cake made with coconut milk.

I didn't do a nice job at dismounting my chiffon cake from the tube pan, this really takes patient and skill.  LOL!


Ingredients:

(A)
1 3/4 cup cake flour, sifted
1 Tbsp. baking powder
1 tsp. salt
1/2 cup sugar

(B)
1/2 cup vegetable or canola oil
6 egg yolks
3/4 cup milk (I used 1 %)
1 tsp. pandan paste

(C)
6 egg whites
1/2 tsp. cream of tartar
3/4 cup sugar

Method:

1. Preheat oven to 350'F (175'C).

2. Combine (A) in a bowl. Whisk to blend. Add (B). Beat with an electric mixer until smooth.

3. Beat (C) with a clean beaters until moist peaks formed. Gradually add 3/4 cup sugar, beating until stiff and shiny peaks are formed. Fold 1/3 of the egg whites into the egg yolks mixture, fold to mix until blended and proceed with the rest of the egg whites. Fold gently but thoroughly. Turn batter into ungreased 10" tube pan.

4. Bake for 55 mins in the center of the oven or til a toothpick inserted in the center comes out clean. Invert cake and cool completely in pan. When cool, loosen the edges with a thin plastic knife and invert pan to remove cake.


The above is the picture of the Pandan paste that I used, usually selling for 99 cent at the Asian grocery store.  This is the brand and paste that I recommend to produce a fragrant cake, essence and powder form are not recommended.  

Tuesday, June 8, 2010

Peanut Butter Banana Cake


I am not sure whether you have noticed.  I have been baking lots of banana cake lately, ranging from just plain, marble, chocolate and now I am trying with peanut butter!  I needed variety so that even though I have been baking almost the same thing but it tasted different.  As I was figuring what else I can put into the banana cake or how to make it different and peanut butter came to mind.

I added chocolate chips per my daughters request, but I didn't add much.  You can add more if you like.  Since the top was kind of bland, I decorated it with heart shape chocolate chips design.  It turned out well don't you think?


This turned out great!  We all loved it and we could definitely taste the peanut butter in it even though it was subtle.   Evy even ask me to make it again.  If you are a fan of my banana cake recipe, give this a try too, providing of course you have no peanut allergy in your household.


Before baking

Ingredients:

(A)
1/2 cup sugar

1/4 cup canola oil (or vegetable oil)
1 large egg
1/4 cup milk (I used 1%)
2 bananas, smashed (I used frozen)

2 heap Tbsp. creamy peanut butter (I used Jiff reduced fat)

(B)

1 cup all-purpose flour

1/4 tsp. baking soda
1/2 tsp. baking powder
1/4 tsp. salt


(C)
1/2 cup semi-sweet chocolate chips, separate  (or as needed)


Soft, moist and yummy!

Method:

1. Preheat the oven to 350'F. Spray a 8" square baking pan with baking spray with flour.  Set aside.


2. In a big bowl, hand whisk together (A). Add in (B), whisk until well blended.


3. Take
half of the chocolate chips and mix in with the batter.  Decorate the other half on top of the batter.

4. Bake for 30 minutes or until a bamboo stick inserted in center comes out clean.


5. Cool on wire rack and store in air-tight container.
Sunday, December 13, 2009

Step-by-Step Zebra Cake Guide

I promised my friend, SIG to show her the step-by-step pictures guide the next time I made the zebra cake, so here it is girl friend.


Two different colors batter.


First, put a dollop of white batter in the center of the pan.


Next, put a little dark batter on top of the white batter.


Then, you add another dollop of white batter on top of the dark batter.


Again, add another layer of dark batter on top. Just keep alternate different color of batter on top of each other until all batters are used.


I didn't do a great job on this as it was not center.


Example of how it would look like when baked and cut. Good Luck!

Recipe of this marbled banana chocolate cake can be found here.

Tuesday, November 17, 2009

Coffee Chiffon Cake


A lot of people liked my Pandan chiffon cake recipe. I also created a lot of other recipes based on this recipe and here sharing with you another variation of chiffon cake, I called it Coffee Chiffon Cake. Really soft and spongy!


Ingredients:


(A)
1 3/4 cup all-purpose flour, sifted
1 Tbsp. Hershey's Specially Dark Cocoa
1 Tbsp. baking powder
1 tsp. salt
1/2 cup sugar

(B)
1/2 cup vegetable or canola oil
6 egg yolks
3/4 cup strong brewed coffee
1 Tbsp. Irish cream liquor

(C)
6 egg whites
1/2 tsp. cream of tartar
3/4 cup sugar


Method:

1. Preheat oven to 350'F (175'C).

2. Combine (A) in a bowl. Stir well to blend. Add (B). Beat with an electric mixer until smooth.

3. Beat (C) until moist peaks formed. Gradually add 3/4 cup sugar, beating until stiff and shiny peaks are formed. Fold 1/3 of the egg whites into the egg yolks mixture, fold to mix and then add the rest of the egg whites. Fold gently but thoroughly. Turn batter into ungrease 10" tube pan.

4. Bake for 55-60 minutes or til a toothpick inserted in the center comes out clean. Invert cake and cool completely in pan. When cool, loosen the edges with a thin plastic knife and gently remove the cake.


Tuesday, September 8, 2009

Marbled Banana Chocolate Cake


My need to experiment in the kitchen again. I used to make a Marbled Chocolate Banana Bread four years ago which I loved. Then, I kind of stop making it because I don't always stock up on chocolate chips. Also I rather prefer the cake texture instead of the bread texture. So, I played with the recipe and created this. I always have cocoa powder in my pantry so I used that instead of chocolate bar or chocolate chips. But I think the chocolate flavor will come out more with chocolate bar or chocolate chips instead of cocoa powder. I hardly taste the cocoa powder, this cake tasted like a banana cake with a pretty marbled effect.


See the marbled effect? They called this Zebra marbling effect.

As you can see, I tried out a new marbling effect which they called zebra. It does look a lot like zebra and very pretty. I made this cake to have for breakfast and afternoon snack so I didn't really pay a lot of attention when doing the layering. Thus, I was actually surprised that it turned out pretty good even with how careless and little care I paid on it. Hence, anyone can certainly do the zebra effect on her cake with ease.


Whole cake view from the top. See how careless I was with it, uneven striped when layering.


Ingredients:

(A)
1/2 cup + 2 Tbsp. sugar

1/2 tsp. banana essence

1/4 cup canola oil (or vegetable oil)

1 large egg

1/4 cup milk (I used 2%)

2 bananas, smashed (I used frozen)


(B)

1 cup all-purpose flour

1/4 tsp. baking soda

1/2 tsp. baking powder

1/4 tsp. salt


(C)

1 Tbsp. Hershey's Special Dark cocoa powder (you can used regular cocoa powder)


The effect!

Method:


1. Preheat the oven to 350'F. Spray and cover the bottom of a 9-inch round cake pan with parchment paper. Spray on top and sides of pan. Set aside.


2. In a big bowl, hand whisk together (A). Add in (B), whisk until well blended.


3. Take out 1 cup of the batter and place in another small bowl. Add in (C) and stir with spoon to combine.


4. Marbling effect: Place a scoop of the white batter in the middle of the pan. On top of the white batter, add some of the dark batter in the middle. Then alternate with white and dark until all the batters are finished.


5. Bake for 30 minutes or until a bamboo stick inserted in center comes out clean.


6. Cool on wire rack and store in air-tight container.


Saturday, August 29, 2009

Strawberry Yogurt Cupcakes


What happen to you when you learned that you are going to have visitors at your home in few hours? And you have nothing to serve them with tea? Of course I have to think of something to make quick with whatever I have at my house at that moment. I found some strawberry yogurts that I bought for my girls in the fridge and my mind was set. I whipped this up in as little time as possible as this recipe only required a hand whisk and a big bowl. The end result was some soft and moist strawberry yogurt cupcakes. This recipe gave me 17 cupcakes.


Ingredients:

(A)
1 1/2 cup all purpose flour
2 tsp. baking powder
1/4 tsp. salt
1 cup sugar

(B)
3/4 cup strawberry flavored yogurt
3 large eggs, whisk
2 Tbsp. whole milk
1 tsp. imitation strawberry extract
A drop of red coloring
1/2 cup canola oil


Method:

1. Preheat oven to 350'F. Place paper cups in the muffin pan.

2. In a big bowl, add in (A). Whisk to combine.


3. Then, make a hole in the center and add in (B). Whisk and blend until incorporated.


4. Lastly, scoop the batter into each paper cups until 3/4 full.


5. Bake for 20-25 minutes or until toothpick inserted in center comes out clean. Cool on wire rack. Store in air-tight container in the refrigerator. It's nice and soft eaten cold too. Or just let it rest for 5 minutes at room-temperature before consuming.

Friday, August 21, 2009

Steamed Pandan Sponge Cake


I have some orange sugar and Eno salt and thought of making a rice flour steamed cake with these two ingredients. The fermentation of rice flour overnight with yeast didn't smell good at all. And the result of this steamed cake was bad, even though it had nice honeycomb effect, but it was hard, smell bad and tasted yucky. I had to give it all to Ms. trash can.

Then, I thought of using the 7-up to make some steamed cake because I remembered I once had a steamed 7-up cake and it was pretty good. This recipe has no butter and oil and the method is like sponge cake. The texture of this cake is spongy and not too sweet. For those who do not have Pandan extract, you can substitute it with pure vanilla extract.


Ingredients:


4 large eggs
2/3 cup sugar
(use 3/4 cup for sweeter cake)
1 tsp. Pandan extract

1 1/2 cup self-raising flour, sifted

50ml 7-up or Sprite


Method:

1. In a large bowl, beat eggs with an electric mixer until light and frothy. Add in sugar and continue to beat until thick and creamy, when you lift the beater and write an 8, it will stay there for few seconds. Add in Pandan extract and beat to mix well.


2. Use a spatula and fold in flour lightly in 3 batches (in one direction), lastly add in 7-up and mix well.


3. Scoop batter into individually paper lined silicon cups and steam on high heat for 15 minutes. Best eaten warm on the same day.